Import Metadata
A beginner-friendly, step-by-step guide to connecting your database, importing its metadata, and viewing the detailed import report so you can visualize your data lineage.
What Is Database Metadata Import?
When you work with databases — whether it's a SQL Server, PostgreSQL, Oracle, or SAP HANA database — your data is organized into schemas, tables, and columns. The structure of this data is called metadata.
Importing metadata means pulling this structural information into Anansi so that you can:
- Visualize how data flows through your system (data lineage)
- Map relationships between tables and columns
- Catalog and document your database structure in one place
Video Walkthrough
Watch the full walkthrough on YouTube: https://youtu.be/erOFSFW8NmE
Architectural Flow Diagram
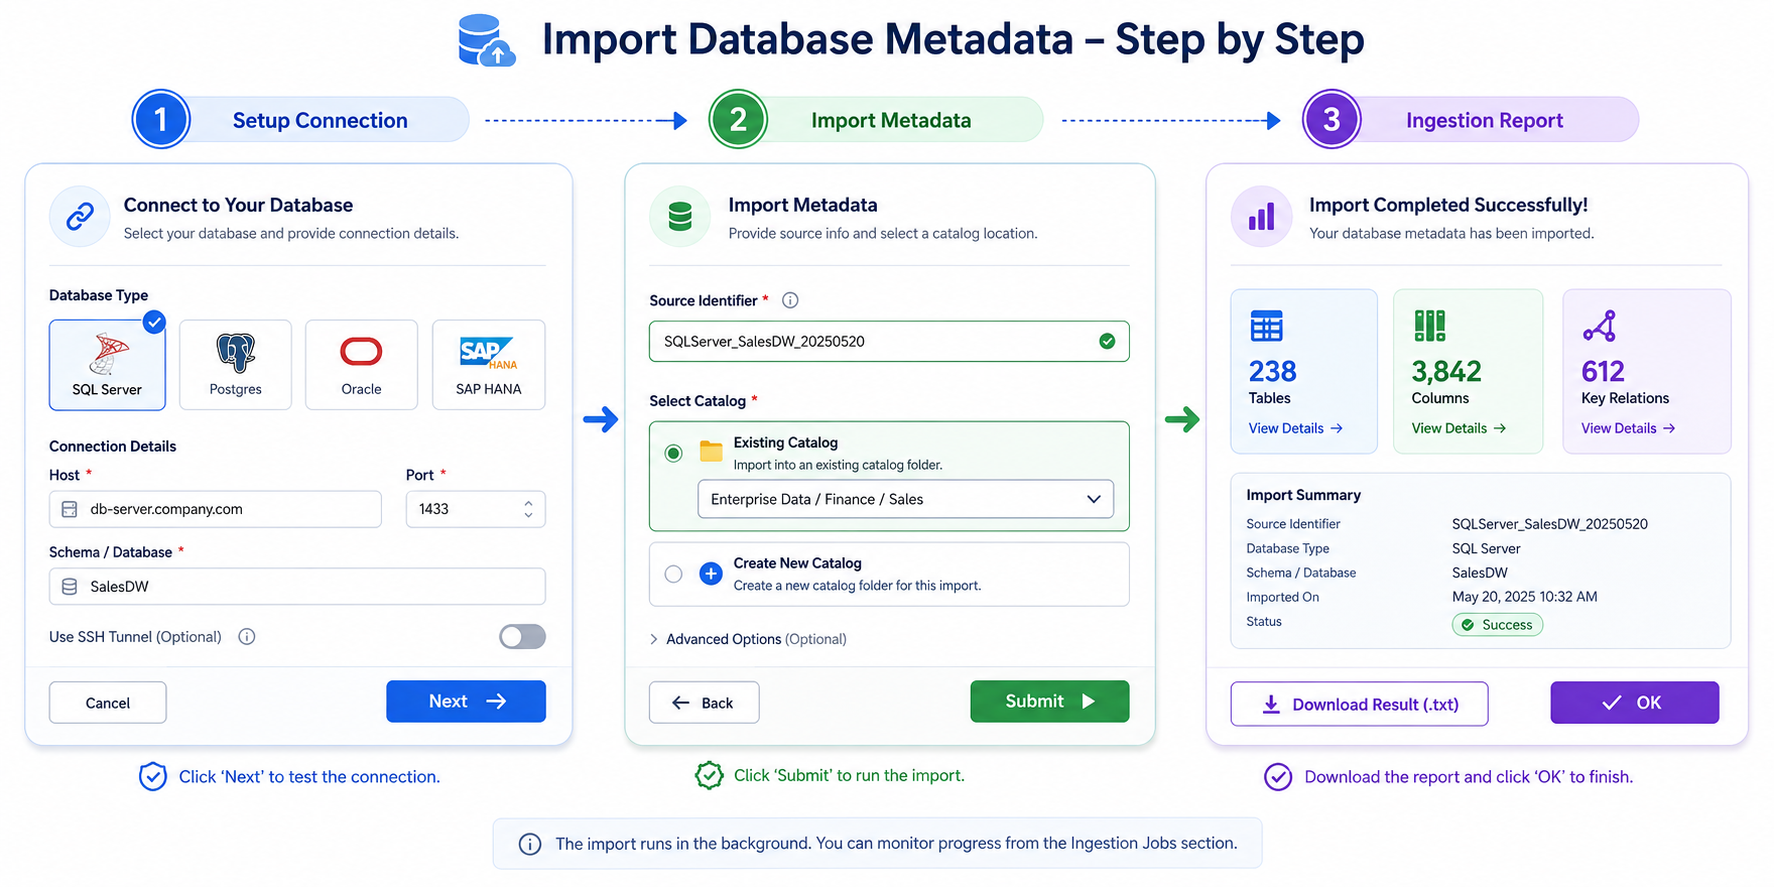
Image shows the architecture of the Database Import process.
Getting Started
How to Access the Database Import Page
From the Dashboard, look for the Data Integration card. Click the dropdown button labelled "Data Import" and select "Database Import".
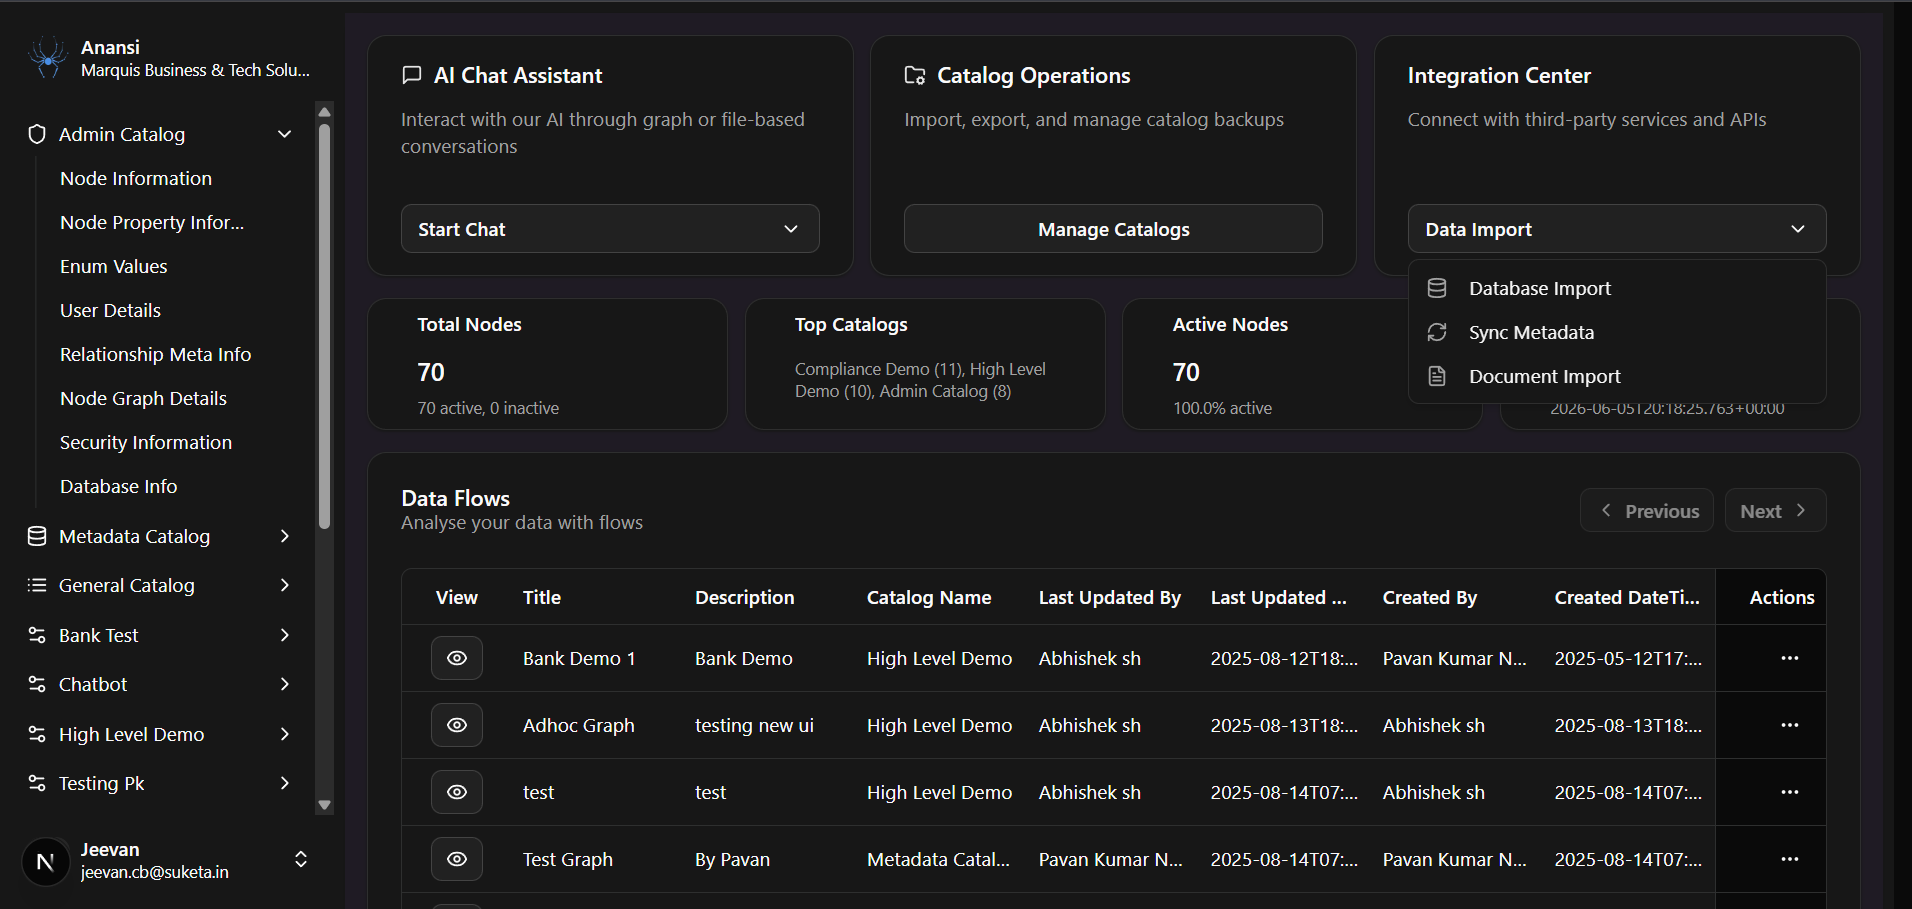
You will be taken to a 3-step wizard that guides you through the process.
The Three-Step Wizard
The Database Import is split into three steps:
| Step | Name | What You Do |
|---|---|---|
| 1 | Setup Connection | Tell Anansi which database to connect to and how to reach it. |
| 2 | Import Metadata | Tell Anansi where to store the imported metadata inside its catalog and choose node labels. |
| 3 | Import Result | View a detailed report of all tables, columns, and keys successfully imported, with an option to download it. |
A visual step indicator at the top of the page always shows you where you are.
Step 1: Setup Connection
Please refer to the Setup Connection guide to configure your database credentials and verify connectivity.
Step 2: Import Metadata
Specify how to organize the imported metadata.
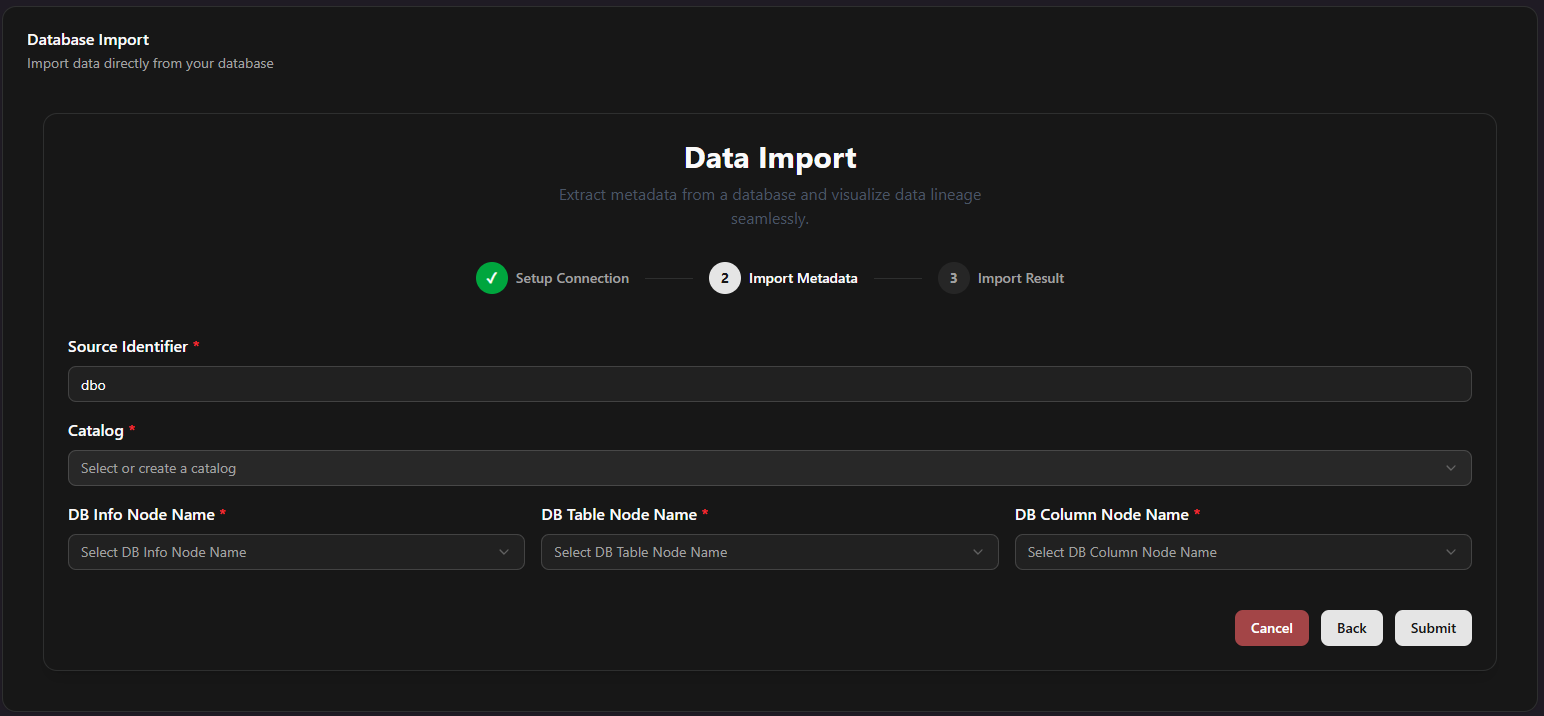
- Source Identifier (Required): A unique label for this source (automatically pre-filled from your Schema Name).
- Select or Create a Catalog (Required):
- Create New Catalog: Choose
+ Create New Catalogat the top of the dropdown. Enter a new catalog name and configure the Node Names (DBInfo,DBTableName,DBColumnName) used to label items in the catalog. Make sure to click "Create Catalog" to register it. - Select Existing Catalog: Choose an existing catalog from the list; its node names will load automatically.
- Create New Catalog: Choose
Click "Submit" to start the import. Anansi will fetch the structure and advance you to the final step.
Step 3: Import Result
Once the import completes successfully, you will be redirected to the Import Result dashboard screen.
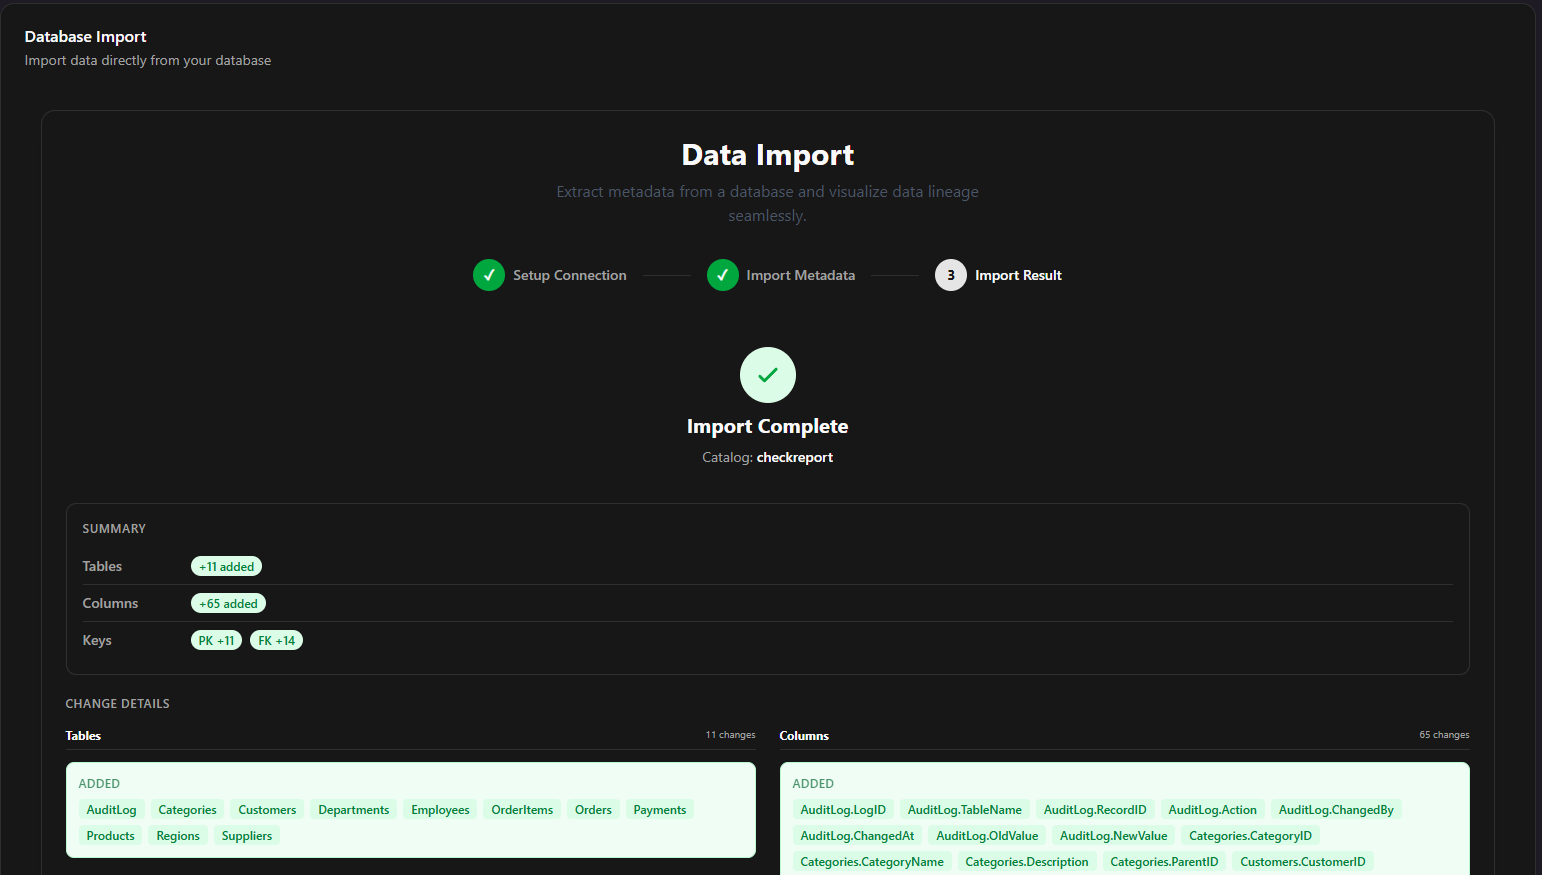
1. Stats Summary
The summary card displays color-coded counts of everything imported:
- Tables: Shows the count of tables fetched and posted (e.g.
+15 added). - Columns: Shows the count of columns fetched and posted (e.g.
+86 added). - Keys: Displays primary keys (
PK +15) and foreign keys (FK +19) extracted.
2. Side-by-Side Detailed Change Columns
Under Change Details, you will see a two-column grid:
- Tables Column: A vertical scroll of all table structures added (e.g.
Regions,Employees,Orders). - Columns Column: A vertical scroll of all column attributes added (e.g.
Regions.RegionID,Employees.CustomerID).
3. Download Plaintext Report (.txt)
Click "Download Result" to save a plaintext report of this run.
- File Name: Saved as
import-report-[CatalogName]-[Timestamp].txt - Content: Includes a timestamped summary header, detailed summary tables (tables, columns, keys), and a full alphabetical list of all structures created in your catalog.
Click "OK" to return to your main Dashboard.
What Happens If I Click "Back"?
If you click "Back" from Step 2, you return to Step 1. All selections in Step 2 (Source Identifier, Catalog, Node Name configs) are cleared and reset to protect you from applying mismatched metadata mappings to a new connection.
Common Issues & Fixes
| Problem | Likely Cause | Fix |
|---|---|---|
| "401 Unauthorized" error | Expired session or token | Log out and log back in to renew your security access token. |
| "Invalid Port" error | Port number is out of range | Ensure your SAP HANA Database SSH ports are numbers between 1 and 65535. |
| "Catalog Required" error | Create Catalog button not pressed | If you chose to create a new catalog, you must click the "Create Catalog" button before clicking Submit. |